Friday, April 26, 2013

Let's Go Bowling! : DIY Record Bowl

Yeah, okay. Cheesy title. Deal with it, I'm punny. It's just I had a day full of bowls and I'm blogging about it. You know?

Found these great vintage mixing bowls at the Troy Goodwill. I passed up on a couple other pieces, trying to be money conscious. Now, I really regret not getting them, and there's no way they are still there. I should follow my gut more often, especially when it comes to adorable vintage things that are reasonably priced. Dang-it thrifty upbringing!


But bowls don't have to cost a cent if you've got an old warped record on hand. I have seen these record bowls at stores and online for the past few years. People are crazy about records these days. It's fun to have some company in the record stores. Normally, I wouldn't condone defacing an album, but this Beach Boys record skipped so much that one side played in about 20 seconds. It was doomed to warp further, I just helped it along. Now it's useful again!


The process was really easy and super quick. Now that I know just how simple it is, I may have to make some more. Guess I gotta stock up on some really desperately scratched 25 cent records at Omega.

I loosely followed instructions from a couple sites online. Like in cooking, I think you just need to feel it out, be patient and attentive.
  • Preheat oven to 200
  • Put a cookie tray with an oven safe bowl on it in the oven for 5 or so minutes (the size and depth of the bowl will help determine the shape of your final product)
  • Place record on top of the preheated bowl 

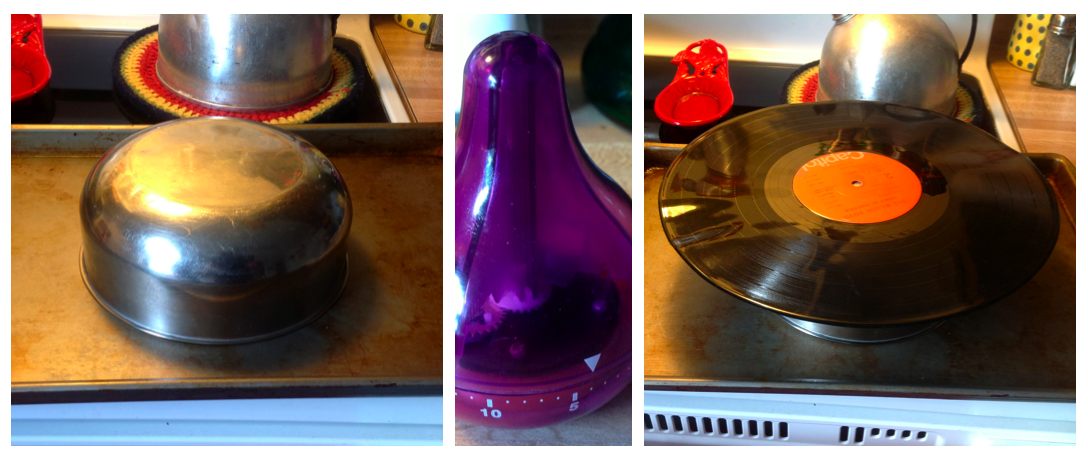
  • Watch as your record bends over the bowl! MAGIC! (it will smell dusty and hot like the first time you turn on your heat in the fall)


  • In about 5-10 minutes, you will want to take the record out of the oven and quickly finish the next step. This step will vary depending on the record type and the oven heat. You can easily test the pliability of the record with a oven-mitted hand. It should bend easily in one place without moving the whole record about.
  • When it seems pliable enough- carefully remove the tray 
  • Quickly flip the record and HOT bowl into a larger bowl (again, the depth and size of this bowl will determine the size/shape of the final product)
  • Remove the hot bowl and shape the record with your fingers (if things don't turn out the way you like, you can always reheat and re-shape)
  • Press the middle sticker down into the bowl to ensure the record has a flat bottom to sit on.


And Voila! You've got a record bowl. Of course, this isn't food safe, and it can't hold wet things. Still, it's doing a great job holding the things that clutter the table near my door.


If you love records, you should check out this really awesome art exhibit which features The Beatles' "White Album". The track near the bottom is so interesting. 


Friday, April 12, 2013

Ikea Nightstand Hack - Cheap & Easy Footstool

My boyfriend is a couch hog. He works hard all day at work. He likes to get comfy afterwards. And that means lying down on my skinny vintage couch effectively taking up the entire length and width of the couch. After many long suffering months of trying to share this space, it became necessary to get: a FOOTSTOOL.

I was kinda aching for a little stuffed box with hidden storage space, but I'm too thrifty to pay 30+ dollars for a tiny piece of furniture. I mean, I got my awesome couch off the side of the road. (One day, maybe, I'll grow up and pay full price for something that hasn't been used already.)

I found the solution at Ikea! Go figure.  I used this simple, inexpensive RAST nightstand as the premise. This was the only thing I found at Ikea that fit the bill. It needed to be short enough to be comfortable to put your legs on while sitting on the couch AND it needed to be thin enough to slide under my coffee table when not in use.
Turns out, a few other web folks have found this Ikea hack on their own- so it's not a NEW idea. But I think my final product is still bragworthy. The whole project took maybe an hour total to complete, though I finished it gradually over a week while I was gathering the necessary tools and add-ons.

What you will need:
  • RAST Night Stand - $14.99
  • Sturdy Material - from my craft stash
  • foam padding (a pillow would work) - from my craft stash
  • staple gun - borrowed
  • gliding furniture tacks - $2.49
  • Murphy's Oil (or other oil or stain) - from the cleaning cupboard


Making it Happen
  1. Stain all pieces using oil
  2. Cut some foam to fit the top of the night stand
  3. Stretch fabric over the top piece and staple (I did the corners like I was making a bed) 
  4. Poke holes through stretched fabric where the screws go in
  5. Assemble the night stand
  6. Tack on gliders

You know me, I like to get things done quickly so I can enjoy them. The unseen details aren't quite as important as the more visible parts of a project. So it doesn't matter to me that there are some salvaged edges showing when you look under the stool. I might eventually hot glue a square of fabric or covered cardboard under here for a more finished look. The glider tacks are a super addition to what was a clunky piece of furniture. they allow the stool to slide across the carpeted floor with ease.


Now I'm on the lookout for a basket or box that will fit perfectly into the open space in the footstool. I can't believe Ikea doesn't have it! 


I love my new footstool. In fact, I'm using it right now. If you're in need of a resting place for your aching dogs, try this one out. It's easily customizable to your stylish space.

Monday, April 1, 2013

The Gift of Decor (or) Window Treatment Fix

Since it's spring, I suppose it's time for a little catch up with Christmas time crafting. (Yeah, that doesn't really follow- but I'm gonna run with it anyway.) My sister is a mother of 4 (soon to be five) who lives in a rental home in Ypsilanti, MI. She's a wonder woman. She cooks, cleans, crafts and home-schools her little ones - and usually with a contented smile on her lips. I adore her and have always looked to her as a role model. One drawback to the business of her life is that she hasn't had much time (or will) to decorate her home since the family moved in last summer. Since it's a rental, it's hard to make an investment in any kind of decor decisions that might be permanent. In six months, she's put 1 nail in the wall. I can't imagine living in an undecorated home. Every apartment I've ever lived in, any home I've ever had a room has been decorated immediately. I can't feel at home until the space feels "homey". 

For her Christmas gift, I put together a low key decor kit for her tiny master bath. It's one of the only places in the house that receives more adult usage than kiddo, and I wanted for her and her husband to feel like it was a little special. Like a little oasis? I don't know if any space in that child-ridden home will ever really be relaxing. (Although, I gotta say, sitting next to the fireplace with one of my brother-in-law's homebrews is pretty magical.) But at least the room has a window treatment - and a bath mat!

A lot of the decor elements came from the Dollar Tree (oh I love that place!). I cut down a bamboo placemat to make a makeshift runner for the flat surface behind the toilet. I made a little candle feature with stones and funny moss covered rocks. The cut-off portion of the placemat had this neat suprise feature of staying in a twisted shape like a vertical pinwheel. I stuck a string on it and it hangs fromt he ceiling! Elements of the decor kit not pictured: bath mat, soap dispenser and toothbrush holder. All in a light sage shade. 


My favorite invention for the bathroom? A tricky way to hang a sheer curtain and valance on only 1 pressure curtain rod. Knowing my sister would be hesitant to put holes in the wall I wanted to take out all the work of hanging the curtains. Problem solved!


I achieved this special magic using a length of foam tubing. (That stuff people on Pinterest have been making wreaths out of!) I cut it to just shy of the width of the window and slit it down one side. Then I put it over top of the sheer on the rod. 

What's awesome about this method is that I could have two sheer panels on the rod and still be able to open and close them to adjust how much light I want to come in the room. You have to tug a little to move the bottom sheer, but it's still effective.


Sorry the pictures aren't better. It's hard to photograph a window feature during the day especially with a silly little camera. (It's so time for an upgrade!)

Making it is simple. I made a rectangular valence the width of the window and finished it on all ends. Then I HOT GLUED the sucker onto the foam tubing. Here's a picture to explain the construction.


I think maybe I might be a genius. (A super-humble genius!)

Happy spring, ya'll!


Related Posts Plugin for WordPress, Blogger...